The Overlooked Treatment Step That May Keep Your IT Band Pain From Improving
Your IT band feels super tight and achy, and the discomfort intensifies as you run. So you take what seems like the logical next step to reduce your pain: You foam roll the heck out of it.
“Everybody loves to sit on a foam roller and just dig into the IT band as much as they can,” Thomas Cunningham, PT, DPT, OCS, a physical therapist at Hospital for Special Surgery in New York City, tells Runner’s World. “They say it hurts so good.”
The thing is, this paradoxical feeling is misleading. Foam rolling your IT band—which is a thick band of connective tissue that runs from the outside of your hip and attaches on the outside of your knee—doesn’t actually do much to alleviate pain there, Cunningham explains.
Keep reading to understand why this popular strategy for reducing IT band pain is not your best bet, plus what to do instead for real relief.
Why Foam Rolling Your IT Band Isn’t Effective
The urge to foam roll your achy IT band isn’t totally off-base: Foam rolling tense muscles—like your quads, hamstrings, and glutes, for example—can help loosen them and relieve pain, Cunningham says. Research supports this notion: A 2019 meta-analysis published in Frontiers in Physiology concluded that foam rolling can boost flexibility and decrease the sensation of muscle pain.
“I get where people are coming from with thinking to roll out the IT band,” Carla Foster, PT, DPT, a physical therapist with Mims Method PT in New York City, tells Runner’s World.
But the problem with the IT band is that unlike muscles, it’s made up of non-contractile tissue, Cunningham says. That basically means the IT band can’t contract (like muscles do), which in turn also means it can’t relax, he explains. So foam rolling it, or trying to stretch it directly, just won’t do a lot.
How to Actually Address IT Band Pain for Runners
A better bet for relieving IT band pain is to focus on the muscles that insert into it, including the TFL (tensor fasciae latae, a small hip muscle), gluteus maximus (biggest butt muscle), and gluteus medius (small glute muscle that’s located toward the outside of your butt).
Specifically, strengthening your glutes can go a long way to alleviating IT band pain. When your glutes aren’t firing properly, the TFL can take on extra work and tighten up as a result. Then, when the TFL gets tight, it can tug on the IT band, causing pain there, Foster explains. So by undoing this pattern with glute-strengthening moves—plus TFL stretches and myofascial release—you can reduce IT band pain.
Indeed, a systematic review of research published in 2024 found that hip abductor-strengthening exercises—that would include moves to target the gluteus medius, minimus, and TFL—helped to lessen the pain and functional limitations from IT band syndrome.
Doing glute stretches is a good idea too, to prevent those muscles from getting overly tight as you challenge them with strength moves and running.
Strengthening the TFL itself can also help. Some runners can have IT band pain due to weak glutes alone, but others can have it due to weakness in the glutes and the TFL. The latter, in fact, is more common, Foster says. That’s why she recommends pairing glute exercises with TFL strength moves. That way, the TFL muscle won’t get as overworked when you run and thus won’t tighten up as much in response, reducing tension on the IT band.
Beyond stretches and strength moves, you can also treat IT band pain with shockwave therapy, kinesiotaping, and dry needling, Foster says. And regularly replacing your running shoes and making sure you ramp up your training volume gradually can reduce your chances of experiencing it in the first place, Cunningham adds.
11 Exercises and Stretches for IT Band Pain
The following exercises and stretches take a two-pronged approach to alleviating IT band pain: They strengthen the glutes and hip flexors (another job of the TFL), and they also loosen up the muscles of the hip. But even if you don’t currently have IT band pain, these are still great moves to do, because they can reduce the likelihood of it cropping up, Foster says.
She recommends incorporating these moves as part of your prerun and postrun routine. Here’s how:
- Before your run, spend 2-3 minutes rolling a lacrosse ball on your TFL (the front/side part of your hip) to loosen it up, then spend another few minutes rolling out your glutes.
- Do 1-2 sets of the windshield wiper dynamic stretch and the reverse lunge crossover dynamic stretch.
- Then do one to 1-2 sets of each of the strength exercises.
- Go on your run.
- After your run, do 2-3 sets of the supine TFL static stretch (or kneeling hip flexor static stretch) and the figure 4 static stretch.
You can also do the strength moves separate from your runs, as a standalone routine three times a week or woven into an existing strength training program. Aim for two to three total sets of each exercise.
For more flexibility work, you can perform all the stretches either dynamically as a warmup prior to running (hold for just a few seconds; keep the stretch moving) or statically as a cooldown (hold each stretch in its end position for the designated time) at the end of the run.
The stretches are also great to incorporate outside your runs. Do them as often as every day, or even two to three times a day, as long as you aren’t hypermobile.
1. Banded Lateral Walks
Why it works: This move is great for activating and strengthening your glute medius. Make it harder by placing a resistance band around ankles (versus thighs), or hold a weight.
How to do it:
- Place a resistance band around thighs and stand with feet hip-width apart, slight bend in both knees to get into a quarter squat position with feet facing forward.
- Engage core and step right leg to the side, stepping as far as needed to feel tension from the band. As you step, think about leading with heel (not pinky toe) and keep both feet pointed forward, with knees aligned over feet.
- Continue moving to the right for 10-12 steps.
- Now step left leg in to the right.
- Do 10-12 reps. That’s 1 set.
2. Single-Leg Glute Bridge
Why it works: This is another great move for strengthening your glutes, including the glute max and medius. Make it easier by doing a double-leg glute bridge. Make it harder by adding ankle weights or placing a resistance band around your knees and actively pressing out against the band at the height of the bridge. Throughout the move, make sure spine is neutral (not arched or rounded) and hips are level the whole time.
How to do it:
- Lie faceup with knees bent, feet flat on floor hip-width apart, arms resting at sides. Lift right foot of the floor.
- Drive through left heel to lift hips up toward ceiling, engaging glutes. Avoid lifting with lower back.
- Slowly lower back down. Keep right leg lifted.
- Repeat for 8-10 reps
- Then switch sides and repeat. This is 1 set.
3. Side Plank With Top Leg Lift
Why it works: This advanced plank variation works your glute medius, while delivering bonus core and shoulder work. Make it easier by placing your bottom knee on the ground to come into a modified side plank. Make it harder by wearing ankle weights or placing a resistance band around your knees or ankles.
How to do it:
- Place right forearm on the ground, shoulder directly over elbow, and hips, knees, and ankles stacked.
- Engage core and lift hips so that body forms one line from torso to feet. This is the starting position.
- Raise left leg straight up to about hip height. Hold for 30 seconds (or, if 30 seconds is too challenging, as long as you can). Make sure hips stay stacked the whole time; don’t let top leg drift forward.
- Switch sides and repeat. This is 1 set.
Trainer tip: If you’re doing more than one set, Foster recommends slightly tweaking the exercise in each subsequent set. On second set, hold the side plank the entire time, but lift and lower your top leg a couple inches. Each time you lift your top leg is one rep; do eight to 10 reps on each side. On third set, come down to the ground and fully release the side plank in between each rep; do eight to 10 reps per side.
4. Banded Standing Clamshell
Why it works: Another excellent exercise for the glutes (both the glute max and medius), this move engages the TFL, too. Doing it standing up (versus lying down, as you would in a traditional clamshell) more closely mimics the single-leg stance position of running. Make it easier by removing the resistance band or by simplifying the exercise and just attempting to balance on one leg. Make it harder by wearing ankle weights or closing your eyes.
How to do it:
- Place a resistance band just above knees.
- Stand and balance on left leg, while lifting right foot up. (Optional: Place right foot against a wall behind you.) Hinge at hips back (the more you hinge, the more challenging the move). Knees should remain in line with each other.
- Rotate lifted leg outward to “open” up like a clamshell without letting standing leg, especially the knee, collapse inward. Focus on keeping hips level as you move lifted leg.
- Lower leg back down.
- Repeat for 8-10 reps.
- Then switch sides and repeat. This is 1 set.
Trainer tip: If you’re doing multiple sets, Foster recommends tweaking the exercise in each subsequent set. For second set, do eight to 10 reps of a standing fire hydrant by lifting your bent leg to the side a few inches rather than rotating it, like a dog raising its leg to pee. For third set, do standing hip CARs, where you basically draw a circle with your knee to take your hips through their full range of motion. Do eight to 10 reps per side, reversing the direction of the circle with each rep.
5. Single-Leg Step-Down
Why it works: This dynamic single-leg move engages your glutes in multiple planes of motion, helping to build well-rounded strength. Make it harder by standing on a foam pad and/or placing a resistance band around the knees and gently pressing your knees into the band.
How to do it:
- Stand with feet hip-width apart on a 6 to 8 inch step.
- Shift weight to balance on one leg and extend the other leg straight out in front of you with toes pointing up. Slightly bend grounded leg to sink into a mini squat and lower down until you tap the floor with front heel.
- Pause, then return to standing.
- Repeat, but now tap heel to the side.
- Repeat, but now tap heel back and diagonally away from body. Those 3 taps equal 1 rep. Make sure knee on the grounded foot stays in line with second toe (don’t let it collapse inward).
- Do 8-10 reps.
- Then switch sides and repeat. This is 1 set.
6. TFL Straight Leg Raise
Why it works: This move targets the TFL directly, helping to strengthen this small muscle. Warning: This one’s harder than it looks, and if your TFL is weak, you may be only able to muster out a couple reps at first. That’s okay! Do what you can and aim to gradually increase the volume over time. Make it harder by adding an ankle weight, or making “rainbows” with your leg over a small object like a yoga block or kettlebell.
How to do it:
- Sit with both legs extended in front of you.
- Bend one knee and place both hands down, while still sitting upright. If this position feels challenging due to tight hip flexors, place hands on the ground behind you and try to sit up as tall as you can.
- Keeping other leg extended, rotate that hip in toward body, then lift the leg up several inches or as high as you can without slouching or bending the knee.
- Hold for a moment, then lower the leg back to the ground.
- Repeat for 4-6 reps.
- Then switch sides and repeat. This is 1 set.
7. Supine TFL Static Stretch
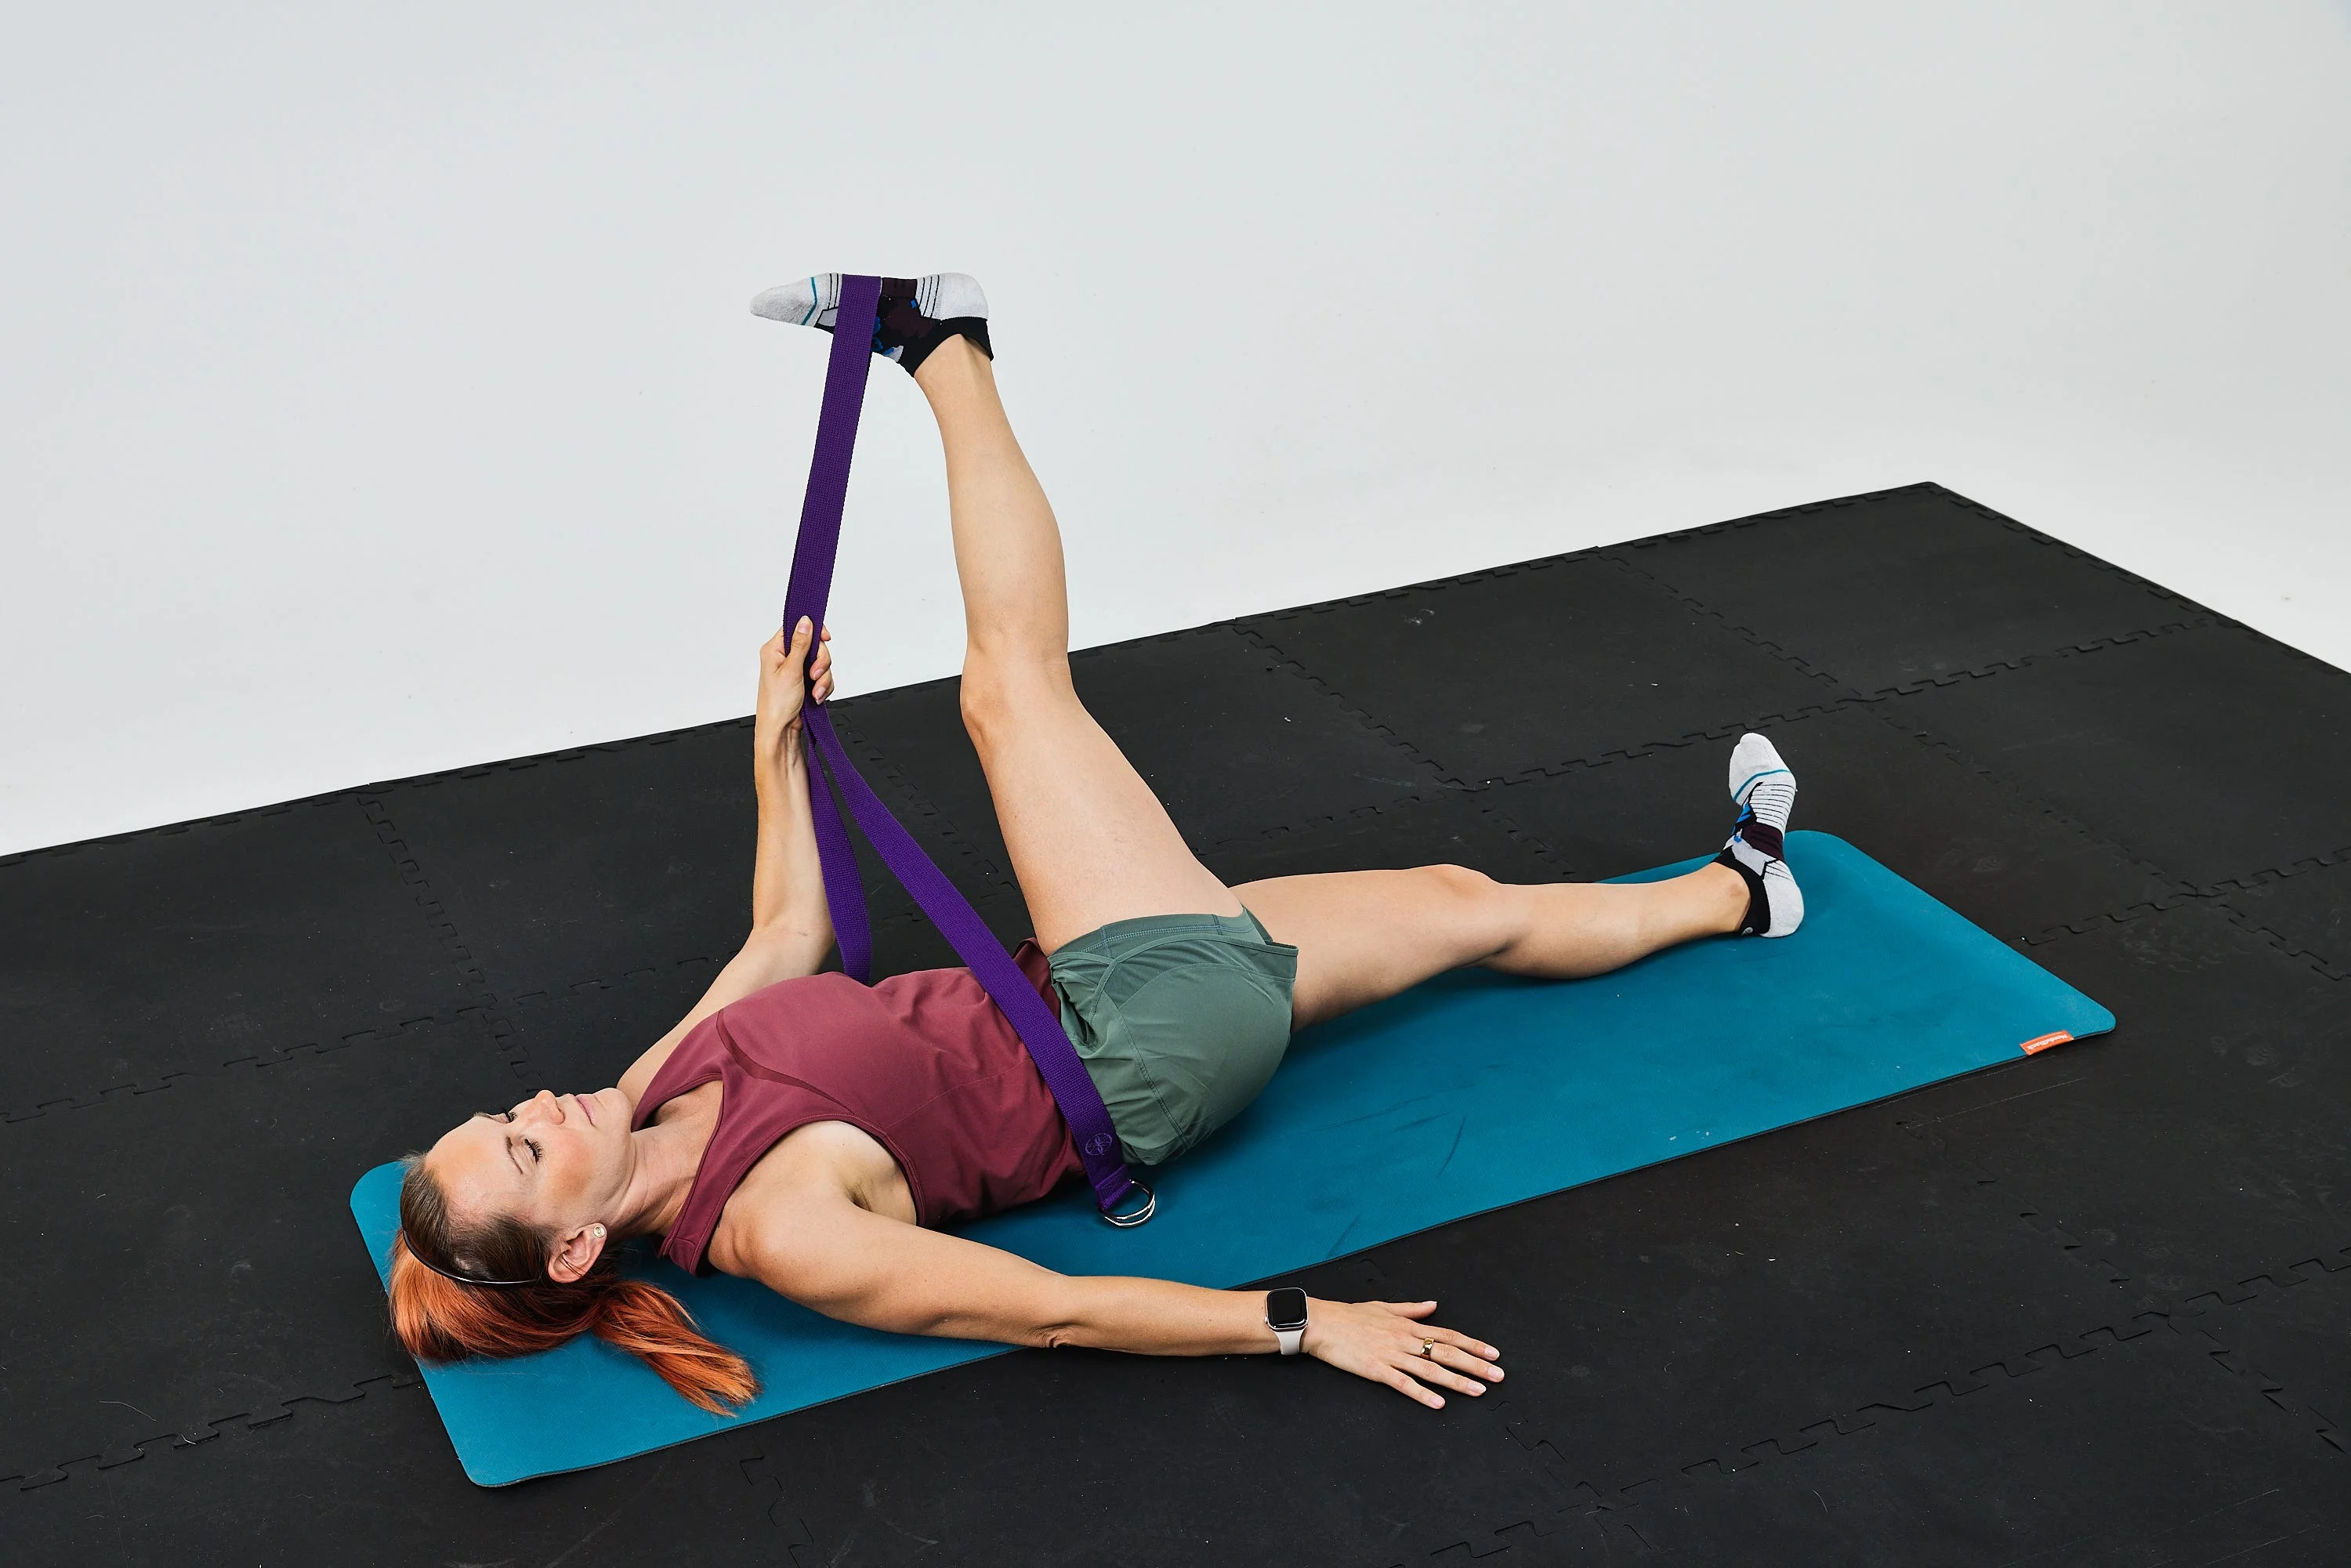
Why it works: This stretch helps loosen up a tight TFL, which in turn can reduce tension on your IT band.
How to do it:
- Lie faceup, legs extended.
- Place a strap around one foot and bring that leg across body while keeping the opposite leg straight and spine in a mostly neutral position (basically, avoid arching the lower back). You should feel this along the side of crossed leg.
- Hold for 30 seconds.
- Switch sides and repeat. This is 1 set.
8. Windshield Wiper Dynamic Stretch
Why it works: This dynamic move helps loosen up your hip flexors, including the TFL, making it a great one to incorporate into a prerun warmup.
How to do it:
- Lie faceup with feet firmly planted about shoulder-width apart, knees bent, and spine in a neutral position (not arched or rounded).
- Keeping a neutral spine, let one knee fall toward the floor to the side. Let the other knee shift slightly toward the fallen knee, but don’t let it drop completely.
- Hold for a moment, focusing on pressing fallen knee down toward the ground.
- Repeat on the other side, moving through center.
- Do 8 -10 reps per side. This is 1 set.
9. Reverse Lunge Crossover Dynamic Stretch
Why it works: Another dynamic stretch, this helps loosen up your glute medius.
How to do it:
- Stand with feet hip-width apart.
- Step back into a curtsy lunge, with back leg only slightly bent. Bring back leg in toward body slightly to deepen stretch on the side of glute of the leg in front. Option to reach same arm as back leg up and overhead.
- Hold for a moment, then return to standing.
- Repeat for 8-10 reps.
- Then switch sides and repeat. This is 1 set.
10. Figure 4 Static Stretch
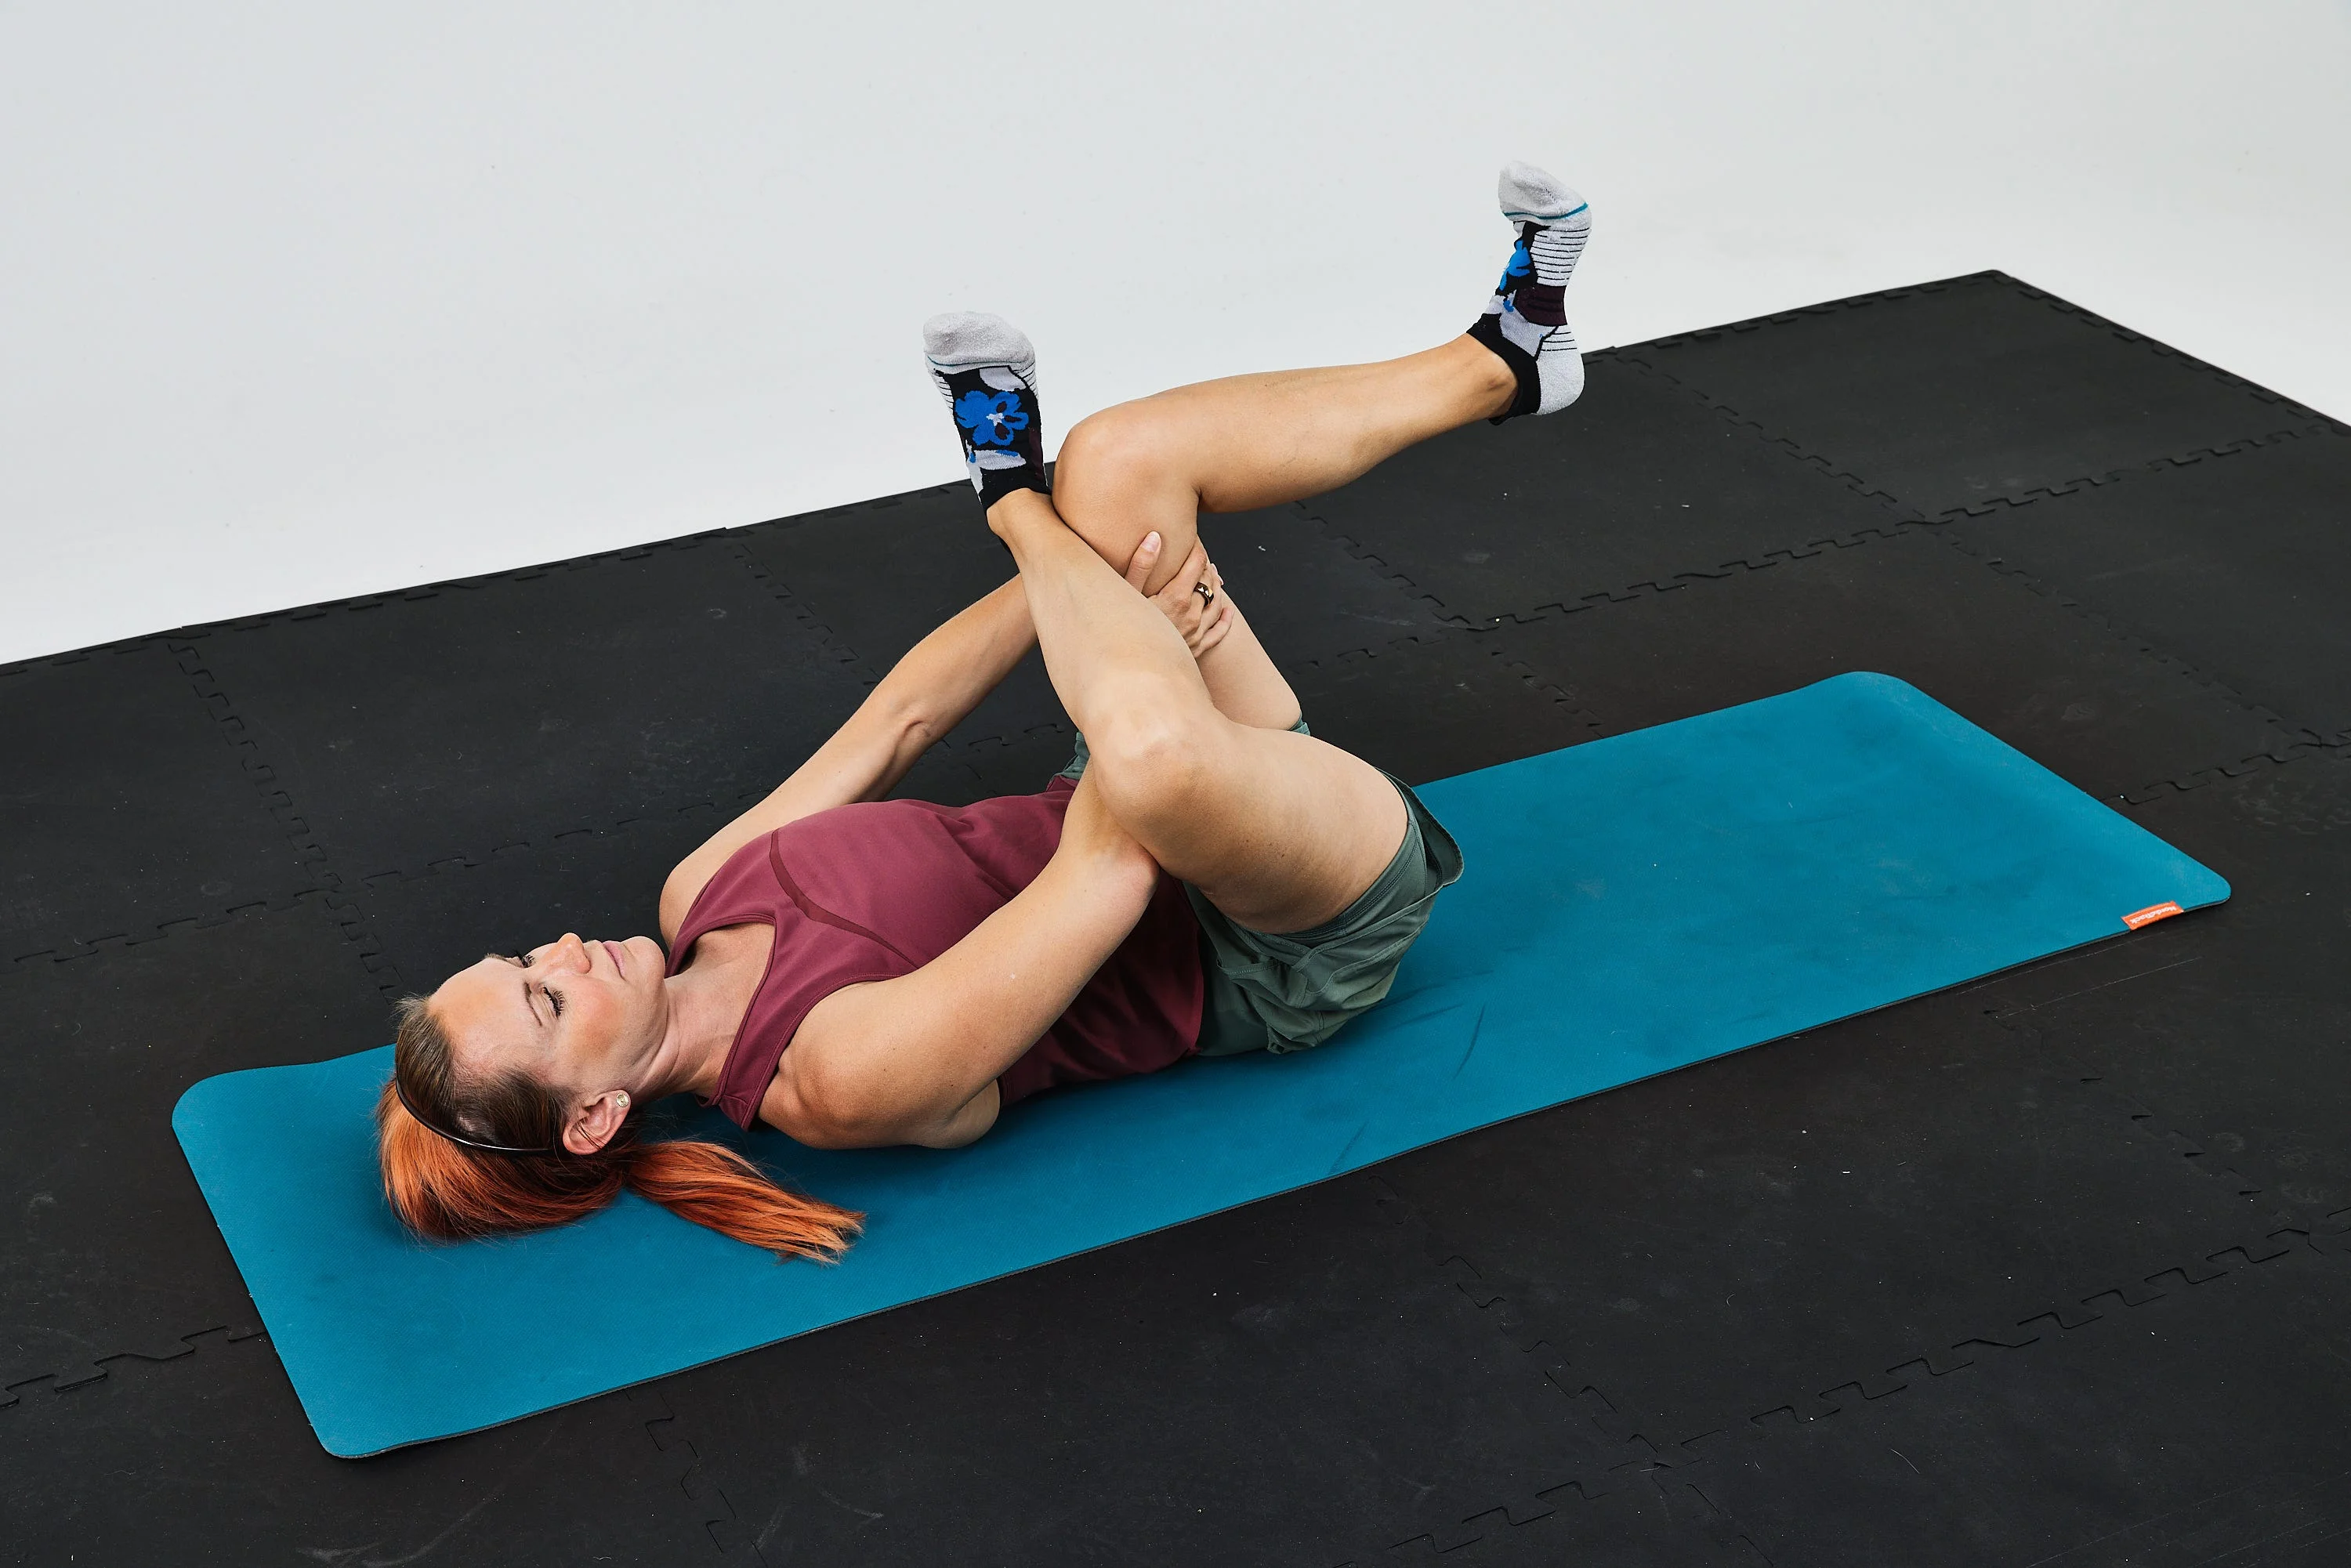
Why it works: This static stretch is a great one to do after a run. It targets the glute muscles.
How to do it:
- Lie faceup with knees bent, then cross right ankle over left knee.
- Lace fingers behind the left knee, then gently pull the left leg toward you to activate the stretch on the right glute.
- Hold the stretch for 30 seconds, keeping upper body flat against floor.
- Relax, then switch sides. This is 1 set.
11. Half-Kneeling Hip Flexor Static Stretch
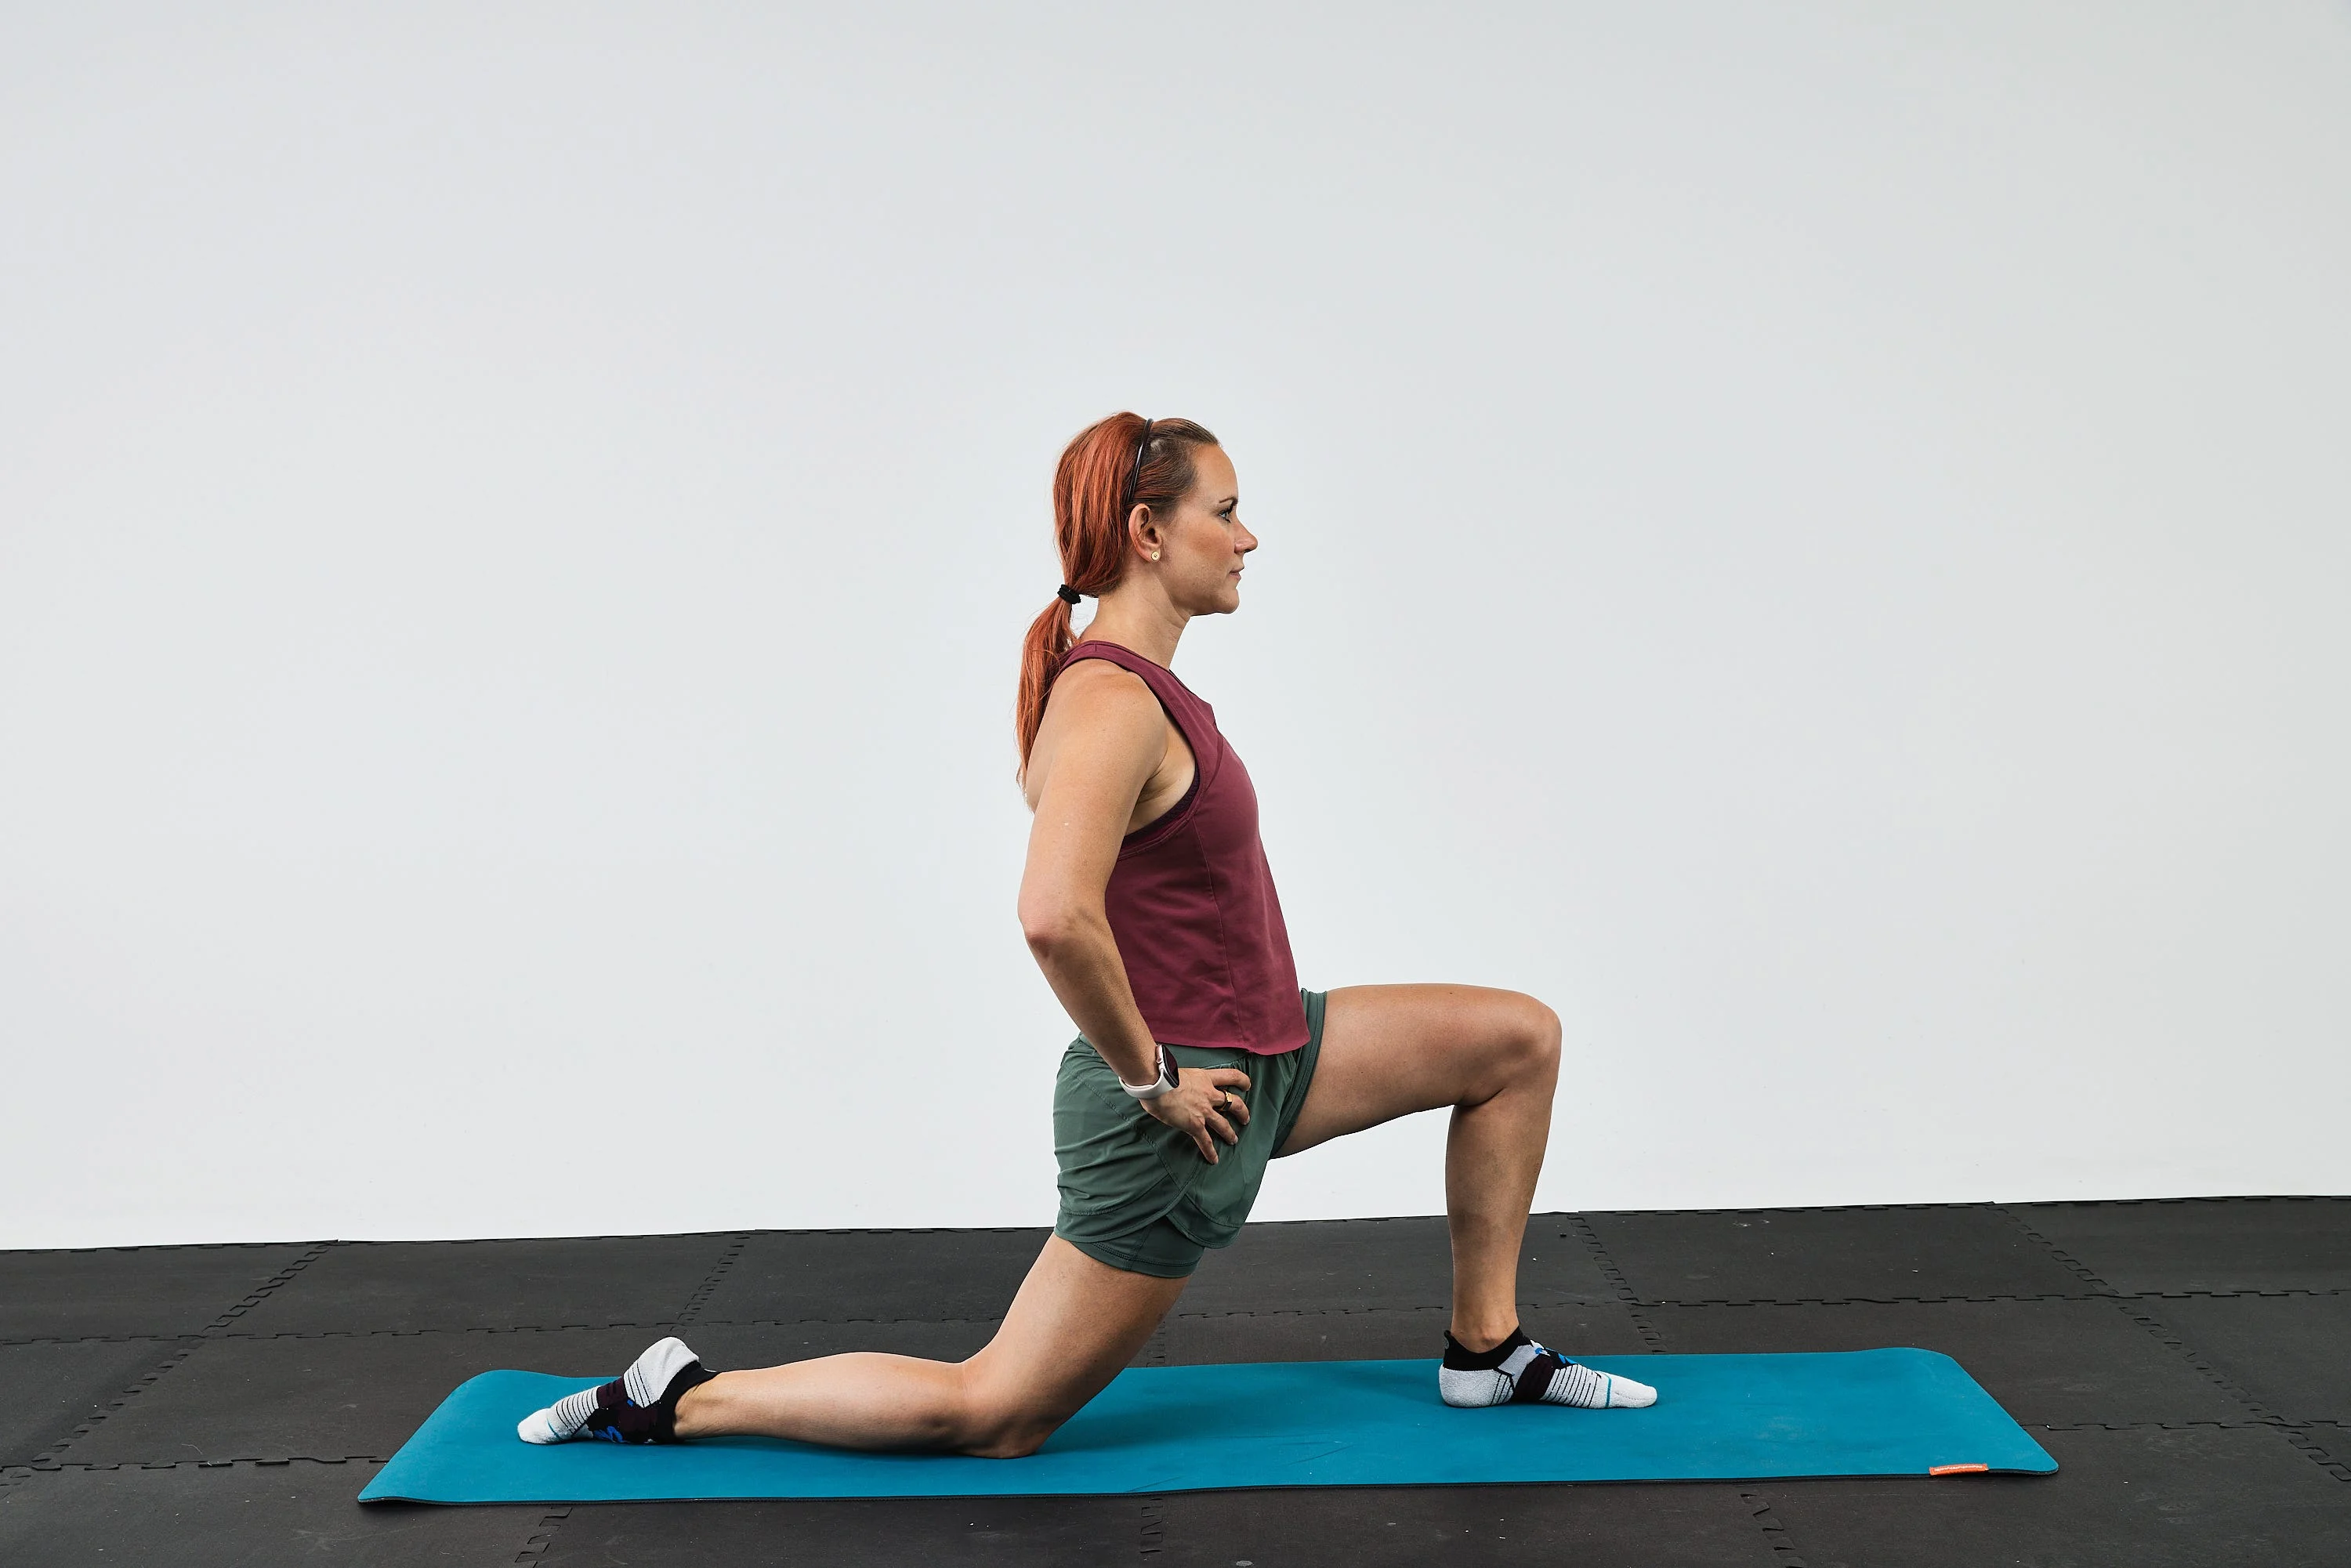
Why it works: This classic stretch can help loosen the muscles on the front of the hip (as well as the TFL) after they’ve worked hard during your run.
How to do it:
- Get into a half-kneeling lunge position with left foot and right knee planted firmly on the ground, both knees bent 90 degrees. Place hands on hips.
- Tuck pelvis under, squeeze glutes, and slightly lean forward, keeping a neutral spine, to feel a gentle stretch through the front of right hip.
- Hold for 30 seconds.
- Then switch sides and repeat. This is 1 set.
When to See a Physical Therapist About IT Band Pain
If you stay consistent with the above stretches and exercises, hopefully you’ll see relief with your IT band pain. But if you’ve been trying these moves for a week or two and your pain is staying the same or getting worse, you should get checked out by a PT, Foster says.
Cunningham agrees that early intervention is wise. “I always tell people the earlier the better,” he says. “The quicker that we can kind of nip it in the bud and get into the proper strengthening and stretching routine, the less aggravating and irritating it's going to be overall.”

Jenny is a Boulder, Colorado-based health and fitness journalist. She’s been freelancing for Runner’s World since 2015 and especially loves to write human interest profiles, in-depth service pieces and stories that explore the intersection of exercise and mental health. Her work has also been published by SELF, Men’s Journal, and Condé Nast Traveler, among other outlets. When she’s not running or writing, Jenny enjoys coaching youth swimming, rereading Harry Potter, and buying too many houseplants.